Urban75 Home About Offline BrixtonBuzz Contact

Basic DIY questions?

For reasons best known to myself I am considering removing part of the back seat of my car, doing so will give me more space on the occasions when I need it. I would need to reattach occasionally, eg for MOT

View attachment 413456

As far as I can tell the seat only joins to the car frame via the nut at the bottom. What tool should I be using to detach / reattach?

I hope to have a go at doing this in the next few weeks
Looks like a Torx bolt, although it kinda looks like a cap/cover on it that you’d have to get off first. On my phone and can’t see very well so that might not be the case (the cap/cover).

If you have a Halfords nearby, they should have a selection of sizes and sets.
 
For reasons best known to myself I am considering removing part of the back seat of my car, doing so will give me more space on the occasions when I need it. I would need to reattach occasionally, eg for MOT

View attachment 413456

As far as I can tell the seat only joins to the car frame via the nut at the bottom. What tool should I be using to detach / reattach?

I hope to have a go at doing this in the next few weeks
They're external torx bolts, requiring external torx sockets.
 
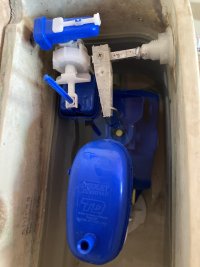
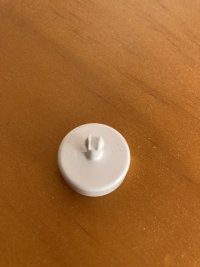
As the ball valve wasn’t shutting off the water I had the flush unit in a 1980s WC cistern replaced recently with a Dudley Turbo. This white plastic cap (?) is in the cistern but not attached to anything. Should it be?

The plumber was from Homeserve but I haven’t renewed the cover, or I’d ask him!
 

Attachments

  • IMG_9580.jpeg
    IMG_9580.jpeg
    98 KB · Views: 5
  • IMG_9581.jpeg
    IMG_9581.jpeg
    107.5 KB · Views: 5
Well this is about as basic as it gets.

How do I change this light bulb?


Seriously.


It’s the bathroom light. I’ve not had to change it since I moved in 4 years ago but now it’s flickering and tripping the rest of the circuit. I can’t see how to change it without unscrewing bits of wire. Is that really what I’m supposed to do here?


The first image is the “bulb” (I guess) with the cover removed. I took that off by popping it with a screwdriver.

The second image is the unit attached to the ceiling. I’ve wiggled it about but it feels like I’d have to wrench it, or manoeuvre it accurately over a flange, in order to get it off the ceiling.

What very obvious thing am I missing here Urban?


IMG_2797.jpegIMG_2798.jpeg
 
Incidentally, I hate and loathe this light. I’d be delighted to use some other bulb or fitting.
 
Just done an image search… apparently I’m not the only person who’s ignorant about this shit. Plenty of threads on Reddit, all of which seem to be as confused as I am. Advice ranges from “get the landlord/ a sparks to do it” to “the whole unit has to be replaced” to more complicated stuff about using specific tools to access particular points via the keyholes.

Why so complicated.
 
It looks like an LED to me so i suspect you will have to replace the whole unit, there is probably a base plate above it screwed to the ceiling and you need to rotate the light to get it off and then unscrew the wires (though I believe some models have push connectors) LED lamp fittings are very common nowadays plenty in B&Q. If you decide to do it yourself rather than get an electrician I'm assuming you're smart enough to know you need to turn off the lighting circuit but it would be remiss of me not to tell you anyway.
 
It’s insanity, to be this complicated to change a fucking lightbulb.

My local hardware shop doesn’t have the replacement. I’m not going out at rush hour to buy a replacement unit. It’ll have to wait til tomorrow.
 
It looks like an LED to me so i suspect you will have to replace the whole unit, there is probably a base plate above it screwed to the ceiling and you need to rotate the light to get it off and then unscrew the wires (though I believe some models have push connectors) LED lamp fittings are very common nowadays plenty in B&Q. If you decide to do it yourself rather than get an electrician I'm assuming you're smart enough to know you need to turn off the lighting circuit but it would be remiss of me not to tell you anyway.


Definitely LED. Looks like it’s one that needs to be completely replaced.
 
It’s insanity, to be this complicated to change a fucking lightbulb.

My local hardware shop doesn’t have the replacement. I’m not going out at rush hour to buy a replacement unit. It’ll have to wait til tomorrow.
World we live in I'm afraid, I used to have an Audi A6 which had integrated digital light clusters on the rear, water got it into one and the whole thing needed to be replaced at a cost of £402.60, time was when I could just unclip a wire and stick a bulb costing under a fiver in.
 
Totally infuriating. How the fuck do these cunts get away with this over engineered shit in a climate crisis world.
 
I guess I’ll be washing and pissing by candlelight til tomorrow.

At least I now know exactly what’s on this circuit lol
 
Well this is about as basic as it gets.

How do I change this light bulb?


Seriously.


It’s the bathroom light. I’ve not had to change it since I moved in 4 years ago but now it’s flickering and tripping the rest of the circuit. I can’t see how to change it without unscrewing bits of wire. Is that really what I’m supposed to do here?


The first image is the “bulb” (I guess) with the cover removed. I took that off by popping it with a screwdriver.

The second image is the unit attached to the ceiling. I’ve wiggled it about but it feels like I’d have to wrench it, or manoeuvre it accurately over a flange, in order to get it off the ceiling.

What very obvious thing am I missing here Urban?


View attachment 414235View attachment 414236
TBH, I'd go and see if you can find a replacement light unit for that before you start...because I don't think you will find one. Which means you are obliged to change the fitting, yay!
 
Well this is about as basic as it gets.

How do I change this light bulb?


Seriously.


It’s the bathroom light. I’ve not had to change it since I moved in 4 years ago but now it’s flickering and tripping the rest of the circuit. I can’t see how to change it without unscrewing bits of wire. Is that really what I’m supposed to do here?


The first image is the “bulb” (I guess) with the cover removed. I took that off by popping it with a screwdriver.

The second image is the unit attached to the ceiling. I’ve wiggled it about but it feels like I’d have to wrench it, or manoeuvre it accurately over a flange, in order to get it off the ceiling.

What very obvious thing am I missing here Urban?


View attachment 414235View attachment 414236
Try twisting the whole unit anticlockwise.
 
Try twisting the whole unit anticlockwise.


Tried that. Felt like one more move and it would cause damage.

I’m not going to try anything else now it’s gotten dark. I can’t do any fixing til I can go get a replacement anyway, so working by torchlight seems redundant.


I’ll try more manoeuvring tomorrow. Dont want to be stuck up the ladder in the dark with a unit that I then have to leave dangling overnight, if it don’t come away clean.
 
TBH, I'd go and see if you can find a replacement light unit for that before you start...because I don't think you will find one. Which means you are obliged to change the fitting, yay!


Ahead of you on this already. And thank you, and you’re probably right. I’ll speak to ma sparks mate on Monday, if I need to.

I’ll report back tomorrow.


Annoying cos I’m going out tonight, and have work deadlines to deal with over the next few days. This bollocks eats into recovery time, and work time.
 
I just got lights fitted in my new bathrooms and it seems you can only buy the fitting with integrated bulb nowadays. This was news to my plumber too, but the electrician confirmed it was the case.
 
Totally infuriating. How the fuck do these cunts get away with this over engineered shit in a climate crisis world.
The problem is that they've been poorly made. An LED taillight should last the life of the car. An LED bathroom lamp should make 10 years easily. If properly made, these things are less wasteful than what they replace. I've got the same cheap as shit bathroom lamp and it started flickering after a whole year. My fault for letting the plumbers spec it.
 
I just got lights fitted in my new bathrooms and it seems you can only buy the fitting with integrated bulb nowadays. This was news to my plumber too, but the electrician confirmed it was the case.
I'll maybe not get something newer for my bathroom then! What I have now is perfectly safe and convenient, it's a dome thing where the dome unscrews and then you can just change the bulb and screw the dome back on.
 
It’s LED. So probably can’t be changed. Annoying?
I got fed up of led bulbs either not working or blowing in the cellar so I put in some led bulkhead lights. One of them blew a while back so I got a replacement but couldn't undo the screws holding the light in place so ended up swapping the led circuit board. Now another one has failed. :facepalm:

So I'm going to replace the crappy bulkhead lights with batten fittings and use normal bulbs in them. :mad:
Yeah. You need to replace the fitting here which is annoying
 
Hope you have some luck with the light today story

So this morning I noticed the bottom of my gate has rotten so the bottom strut which the hinge attaches to is no longer connected to the gate itself

IMG_0192.png

So I think need a new gate, ideally sitting a few inches higher off the ground as it drags on the path a bit and when it’s shut it sits on the ground level which must be getting moisture in. Is this doable with one person. I’m 6 foot and fairly strong and can use a drill?

It was also dragging on the gravelled area in the left when fully opened but this is now mitigated (previously to that area being gravelled the ground level was a few inches higher and there was long gras)
 
Hope you have some luck with the light today story

So this morning I noticed the bottom of my gate has rotten so the bottom strut which the hinge attaches to is no longer connected to the gate itself

View attachment 414327

So I think need a new gate, ideally sitting a few inches higher off the ground as it drags on the path a bit and when it’s shut it sits on the ground level which must be getting moisture in. Is this doable with one person. I’m 6 foot and fairly strong and can use a drill?

It was also dragging on the gravelled area in the left when fully opened but this is now mitigated (previously to that area being gravelled the ground level was a few inches higher and there was long gras)

Yes definitely. Use some bits of wood or something of the right thickness to hold the bottom of the gate where you need it while you get it square and in position to mark where the hinges will go, then drill pilot holes, re-position gate and screw in. Should be a doddle :)
 
Cheers, that’s good to know. I will take a proper look at it when I have some spare time. My dad is around next weekend and could help me if the weather behaves.
 
Hope you have some luck with the light today story

So this morning I noticed the bottom of my gate has rotten so the bottom strut which the hinge attaches to is no longer connected to the gate itself

View attachment 414327

So I think need a new gate, ideally sitting a few inches higher off the ground as it drags on the path a bit and when it’s shut it sits on the ground level which must be getting moisture in. Is this doable with one person. I’m 6 foot and fairly strong and can use a drill?

It was also dragging on the gravelled area in the left when fully opened but this is now mitigated (previously to that area being gravelled the ground level was a few inches higher and there was long gras)
Yes, as prunus says. I've hung many a door by myself, and while it can be a bit tricky sometimes, it's not that big a deal.

I'd recommend propping the gate to the right height, as Prunus suggests, then mark the position of one of the holes in the top hinge on the gate post. Drill, then screw the hinge to the post, but don't do the screw up fully tight. Do the same with the bottom hinge, so you have two hinges properly located - check by swinging the gate that they're not binding (which might indicate a problem), then drill the remaining holes and screw.

Possibly the most important thing is to make sure when you attach the hinges to the gate in the first place that they are square - ie that the pivots of the hinges are aligned and exactly vertically aligned to the gate edge, or you'll get squeaky hinges which will wear out quicker.
 
Back
Top Bottom