Urban75 Home About Offline BrixtonBuzz Contact

Basic DIY questions?

Thank you.

So given its had two coats can I now skip that sealer I should have used and now just sand and revarnish? I've got sugar soap. Can I wash down with that after sending instead? Any milage in using an electric sander if I can borrow on for each coat or just man up and do it by hand?

Yep, you can skip the sealer, seeing as the wood has soaked up 2 coats. :)
Hand-sanding is better for just flatting varnish before applying another coat, because you only need a light touch - you're just looking to flat out little micro-bubbles and hairs - to do it. No need to wash down, just wipe down with a barely-damp cloth when you've finished sanding, and leave about ten minutes before applying the next coat.
 
If you pop the faceplate off the socket that can give you a clue about which direction the cables feed from. They _should_ feed in a straight line vertically or horizontally (not diagonally).
 
Big crates filled with caving rope and metal work.
Multi-Fix Concrete Screw Countersunk - Yellow | TIMco

These make very secure fixings, I use them to wall-mount cabinets full of network equipment. No plugs needed. Start with a 6mm drill bit and increase by .5mm if the screw won't go in at all. You'll need a T30 Torx bit to drive the screw in (often you get one in the box) and if you can borrow an impact driver it'll save your wrists.

Edit: If you're going to try this on a plasterboard wall then find the studs as someone suggested and affix a square of thick plywood to the studs (crossing at least 2 studs), then fix your crate or shelf to the ply with many beefy wood screws.

Thanks. Another number. :D

That's for the next "cupboard". Will what I listed before work for a say up to 10kg?
 
I've also been using these recently, they're fucking great but you do need some understanding of what you're drilling into. Self tapping so don't need rawl plugs... Also need a decent driver, but you kind of need that anyway.

03120.jpg


e2a: ah, keybored mentioned them. So don't ignore keybored on those, just the rawl plugs bit.
 
OK. I was considering buying just a couple to start with. Kinda like kitchen knives... Buy a few good rather then a load of cheap ones or does it not matter so much?

What size rawl plugs and screws then are best for heavy loads?
Buy a set of drillbits by someone like Makita, de Walt or Bosch. You can buy sets of c 6 of the most common sizes in a little case for about a tenner. Look for masonry bits.

Buy a spirit level.

If you are starting out, try to put stuff into solid walls- as plaster board and so on takes a bit more getting used to.

Measure twice, drill once.... i.e. Leave yourself enough time to do it properly and check what you are doing.

Fully charge the drill, and make sure you drill the hole straight. Once you have drilled check again before you put the rawl plug in and then put the shelf up.

Put all the screws about 3/4 of the way in before you finish them off and tighten them up- means if you have made a mistake is easier to fix- check level again- but also if you tighten one screw loads and loads you can potentially distort a plywood or soft wood shelf/cupboard and mean it's impossible to get a decent finish.

Accept something that takes a professional 5 minutes may take you 30. It's no big deal- just give yourself time.
 
Mainly the old imperial screw gauges, but also I think brown/7mm masonry/5.0mm screws are a better go-to standard than red/5.5/some imperial thing.
Ok. A #10 screw is the same as a 5mm diameter screw, so I'll call it a 5mm screw for the sake of argument here.

It takes more force to drive a 5mm screw into a red plug set in a 5.5mm hole, than into a brown plug/7mm hole. This makes a tighter fixing which would take more force to pull out so this is what I tend to use. I'll use 4mm (#8) screws for lighter duty. I only really use brown plugs if the masonry is so crumbly the hole doesn't hold a red plug.

Obviously taking this to extremes such as a 12mm screw into a yellow plug is never going to work.
 
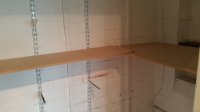
Well the tool collection is growing, I spent loads in B&Q and am slowly getting there. Quite proud of my attempt to shelve the airing cupboard, all with salvaged wood. I suspect all my projects may have been slightly over engineered. 10mm holes seem massive!

Major project starts tomorrow. I've got a big cupboard in the utility room and a big pile of MDF I had cut today. I really want a cutting machine like they have in B&Q.
 
Don't sand mdf - the dust is NASTY stuff. If the edges are going to get worn (ie make dust) then seal with well thinned varnish (or paint them) which will also keep them from getting damp. Do any cutting with a vacuum cleaner running nearby and wear a good mask.
(as you can tell, I don't like mdf ... I much prefer real wood)

Wood dust is nasty... Some a lot worse than MDF. Yew, for example, is actively toxic. The tropical hardwoods are nightmarish on the skin and some of the cedars are surprisingly bad. Many are implicated in respiratory diseases... Generally it's worth being a bit more careful around MDF because of the formaldehyde, but with a sense of awareness that general wood dust is far from safe.
 
That's for the tips. Hadn't taken into account the varnishing.

The MDF may be beautifully cut, but the brick work certainly isn't even. I'm having to shave little bits of here and there to make them fit.

I've done the smaller shelves on that spur stuff you screw to the wall. Wish I'd just gone for lots of that rather then batons. Ah well. I never expected it to be simple.

Last night in the pub we were talking about a much larger shed and I suggested that we just build one out of brick. This is a kinda humbling experience!
 
Turns out I can't measure for shit either :facepalm:

Oh well out with the Jigsaw again!
 

Attachments

  • 20161130_134740.jpg
    20161130_134740.jpg
    203.4 KB · Views: 26
That's for the tips. Hadn't taken into account the varnishing.

The MDF may be beautifully cut, but the brick work certainly isn't even. I'm having to shave little bits of here and there to make them fit.

I've done the smaller shelves on that spur stuff you screw to the wall. Wish I'd just gone for lots of that rather then batons. Ah well. I never expected it to be simple.

Last night in the pub we were talking about a much larger shed and I suggested that we just build one out of brick. This is a kinda humbling experience!

Breezeblock would probably be more practical (not to mention cheaper) than brick, then just get a local builder to slap some render on the exterior. It's also easier to demolish if the planning babylon try to victimise you.
 
So the afternoon has just been slowed down again. The ancient Black and Decker mains drill my Dad gave me just went bang. Smell of burning, electrocuted me and burnt a hole in my t shirt. The extension it was plugged it is now defunct. I suspect I had a close shave!
 
Last night in the pub we were talking about a much larger shed and I suggested that we just build one out of brick. This is a kinda humbling experience!

The reasons sheds & hut are normally wood based is they are not seen as permanent structures therefore not requiring planning permission. As soon as bricks are involved it is a different kettle of shed.
 
If they're physically attached to the house they're exempt - up to a maximum size.
I built an block extension 23 years ago partly because it was cheaper than a wooden shed - or rather was far better value for not much more investment.
 
Bugger. This now taking lot longer with my battery power Bosh over the mains drill.

I wasn't planning on varnishing MDF, but am heading advice! I've got some Screw fix yacht varnish which I've diluted with 20% white spirit. It's soaking it up like a sponge and will undoubtedly need a bigger can. How many coats does it need to make it water resistant and stop it warping over time?
 
I've no experience of varnishing MDF, but I have an MDF windowsill and the special primer was probably even thicker than emulsion.
Is it going to be exposed to moisture ?
 
Bugger. This now taking lot longer with my battery power Bosh over the mains drill.

I wasn't planning on varnishing MDF, but am heading advice! I've got some Screw fix yacht varnish which I've diluted with 20% white spirit. It's soaking it up like a sponge and will undoubtedly need a bigger can. How many coats does it need to make it water resistant and stop it warping over time?
Stick a couple of thinned coats on, and that'll seal it. Then lightly sand it, to get rid of any little bits and pieces, wipe down, and give it another thinned coat. Then apply a couple of coats of full-fat varnish. Naturally, you need to leave it to be at least tack-dry between coats. If you want to be OTT about it, sand back between coats, but that will mean letting them fully dry first.
 
It's deep shelving for a cupboard. Hopefully not exposed to moisture. Don't care about how it looks as it's the way, it's just for protection. That seems very full on existentialist, although I've got some doors to do next which I will take that level of care with. Used a tin of Johnsons water based stuff in them. This cheap yacht Varnish seems very different stuff!

Biggest problem is finding space to do these shovels before they are screwed in. Luckily its a dry day, so need to get as much on as I can as we desperately need the storage space!
 
I'm late to the party, but you can buy quite deep shelving wood lengths at B&Q and cut it to size. I made some shelves to fit in an alcove a few years ago. I used smaller wood batons and drilled through them and into the wall to act as brackets. If the shelving is going to span a long distance or have very heavy things on it you can do one or two along the back of the wall as well.

These shelves have held up really well for the past few years with double-row double-height stacked books on them.
 
Wood already bought. They are much deeper then any premade shelf. Using Battons, but it's proving hard. The brick work is far from even, so I'm having to modify each on to fit in past with my jig saw as I go.
 
It's deep shelving for a cupboard. Hopefully not exposed to moisture. Don't care about how it looks as it's the way, it's just for protection. That seems very full on existentialist, although I've got some doors to do next which I will take that level of care with. Used a tin of Johnsons water based stuff in them. This cheap yacht Varnish seems very different stuff!

Biggest problem is finding space to do these shovels before they are screwed in. Luckily its a dry day, so need to get as much on as I can as we desperately need the storage space!
Well, if you know it's not going to get damp, you probably don't need to worry so much. I had in mind the bathroom cabinet I'm currently constructing around the boiler, which I do want to ensure is reasonably moisture-proof... :)
 
Wood already bought. They are much deeper then any premade shelf. Using Battons, but it's proving hard. The brick work is far from even, so I'm having to modify each on to fit in past with my jig saw as I go.
Just a thought, but what's the distance between supports? MDF isn't great at not bending, and if you're much more than 80cm-1m (especially if it's less than 18mm thick), consider screwing a batten (or two) across the width. 18x22+, edge on, screwed through the MDF into the batten will prevent sagging, or worse.
 
Back
Top Bottom