Urban75 Home About Offline BrixtonBuzz Contact

Basic DIY questions?

What are they called?
I googled "door handle springs", and found the most aptly-named company in the world :D


Other suppliers are available. They come in many different types, so you will be glad to grab one of the handle springs (even if broken) to enable you to make a match.
 
FWIW, you can buy replacement springs for the handles. They always go. They're quite cheap, but can be a bit of a faff to install. AIR, a pair of needle nosed pliers is an essential. But it's a very satisfying job to do. :)
Yep I think ours is on the way out. I didn't realise it was a spring that you can replace, thanks.
 
Coincidentally I have a similar problem. I am trying to replace my floral china door knobs with some more modern ones but the spindle on the new shiny chrome Wilko ones is fatter and won't go through. Online descriptions don't seem to mention spindle width so I have no idea how to get the right ones.
 
These are the sorts of things where the best approach is to go into a proper ironmongery/hardware shop with the bits from the old thing you're trying to replace, and ask someone who knows what they are tayking about, what you need.

The alternative can be hours scrolling through online listings with unclear information, taking a stab at what looks like the right thing and failing, several times over.

Sometimes the answer is that you are trying to replace part of something that isn't even made in those dimensions any more.
 
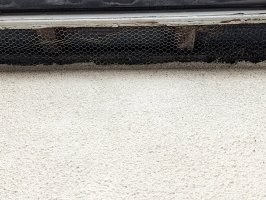
Any thoughts on what is causing my leaking kitchen roof? Specifically it occurs when we have really heavy rain with lots of wind. The construction of the kitchen roof is felt which is in good condition. Current theory is water is getting behind the frame of the window or it is coming from higher up. The seal around the window looks ok though to my untrained eye. Really need to sort this as kitchen ceiling now has unsightly water makers.

Photos to assist diagnosis:
 

Attachments

  • PXL_20230318_145050143.jpg
    PXL_20230318_145050143.jpg
    177.8 KB · Views: 20
  • PXL_20230318_145142337.jpg
    PXL_20230318_145142337.jpg
    406.8 KB · Views: 19
Not easy to tell as would need to know what’s where in relation to the water marks but if that’s your soffit, with the chicken wire, I wouldn’t be surprised if water running or dripping down is getting blown under and through that although a pic a bit further out and possibly some of the inside would assist :)
 
  • Like
Reactions: MBV
Right so light fitting has gone for a burton and I now have a 3 or 4 inches of flex hanging loose from the pendant

823A0789-68DF-4E2D-9711-78CA613D8B78.jpeg
What do I need to do?

I was thinking first thing to turn off the fuses and tape up loose flex to make it all safe. Then what?

Take the pendant fitting off and replace with a new one? But I’m a bit concerned there’s not enough flex to attach a new one properly. Perhaps I need to get a sparks in (I have a few other jobs that could get done at the same time)
 
Right so light fitting has gone for a burton and I now have a 3 or 4 inches of flex hanging loose from the pendant

View attachment 368496
What do I need to do?

I was thinking first thing to turn off the fuses and tape up loose flex to make it all safe. Then what?

Take the pendant fitting off and replace with a new one? But I’m a bit concerned there’s not enough flex to attach a new one properly. Perhaps I need to get a sparks in (I have a few other jobs that could get done at the same time)
About your easiest bet is going to be getting a ceiling rose and pendant set (Screwfix do them for a very few quid). You'll need to be a bit careful wiring up the rose, but it should be obvious from the existing one which wires go where - worth taking a photo of the wires going into the rose before you start, for colours, etc.
 
About your easiest bet is going to be getting a ceiling rose and pendant set (Screwfix do them for a very few quid). You'll need to be a bit careful wiring up the rose, but it should be obvious from the existing one which wires go where - worth taking a photo of the wires going into the rose before you start, for colours, etc.
cheers, I’ll nip down to screwfix then and have a go at swapping it out. Good point about photos.

I’ve replaced roses once or twice before I think and don’t remember being very good at it. Very fiddly and twice as hard having to do it on a ladder. Still it will be good if I can fix this
 
cheers, I’ll nip down to screwfix then and have a go at swapping it out. Good point about photos.

I’ve replaced roses once or twice before I think and don’t remember being very good at it. Very fiddly and twice as hard having to do it on a ladder. Still it will be good if I can fix this
Don’t tape the end of the flex and hope it will be safe.
Can’t properly see on my phone but it kinda looks like both cores of the flex are bare and touching. Better to whip the cover off and disconnect the flex from inside. 30 second job.
And do what existentialist says :thumbs:
 
cheers, I’ll nip down to screwfix then and have a go at swapping it out. Good point about photos.

I’ve replaced roses once or twice before I think and don’t remember being very good at it. Very fiddly and twice as hard having to do it on a ladder. Still it will be good if I can fix this
If you don't fancy changing the rose you could get a new one and just change the flex bits, then it's only 2 wires to deal with.
 
Well I’ve taken the old rose off and taken pictures of things. But struggling to balance on the ladder so I’m waiting for there to be someone here to hold the ladder before I try it again. My dad is here at Easter so that’s only a week away.

If you don't fancy changing the rose you could get a new one and just change the flex bits, then it's only 2 wires to deal with.
I wish I’d seen this earlier, as that would have been a lot easier
 
You used to be able to just get the pendant bit without the ceiling rose but don't seem to do them at Wickes or Screwfix anymore.

It was only after I had unscrewed all the wires from the junction box thing that I realised that due to where the holes are in the ceiling (and the size of the cap that covers the rose) I was better off just swapping out the flex and pendant as you suggested and as a mate did too (but I didn’t understand what he meant).

Theoretically all I need to do is connect the wires back where they were but I’m struggling to do that (can’t get enough wire through the rose to screw them into the junction box) and have had a few near misses on the ladder. So for now I’ve unscrewed the rose again and have taped up the loose wires as a vague nod to health and safety. Hopefully my dad can help at Easter but if not the dining room light is u/s for the foreseeable. Still at least it’s a good excuse not to have people round.

Unfortunately this has reminded me why I hate DIY and I now regret buying the bloody lampshade in the first place.
 
When I moved in to this flat the bath was a bit scratched, and I bought some spray enamel paint to cover it. It was fine for a bit then started peeling. it .ooks absolutely dreadful now. Is there any way of getting it back off again down to the original enamel?

unnamed.jpg
 
I’ve bought a drain cover and need to cut it down to fit the pipe layout. Is it just a case of using my hole saw where appropriate (there are some pre marked holes) or does this call for a hacksaw or similar?

197347EB-43A8-46E2-BCDD-04BC7350BE4F.jpeg6CB6BCCD-ED78-4164-B20C-1DF90A8CB9CA.jpeg
 
I’d use tin snips to cut it to shape probably. Depends how close you want to get it to the shape of the pipes. Hacksaws are good for straight lines
 
Has anyone built a log store?
yes.
I would make a huge one ... or as big a one as you can.
Part of my stack is still seasoning, the main pile is already dry.
One trick is to keep the air gaps underneath and behind the stacked logs. Chicken wire is good for the back panel.
 
Hacksaw will work fine. Hole saw might melt the plastic. :(

I’d use tin snips to cut it to shape probably. Depends how close you want to get it to the shape of the pipes. Hacksaws are good for straight lines
Thanks both. I ended up going for a combination of hole saw and hacksaw not having tin snips. Had to cut off a bit completely on the right to get it in over the pipes. I can’t say it’s the neatest but just about managed to drill a hole for one of the wings m under the pipe (a very close fit) and them an even closer fit lying on my tummy to screw it in.

The bit I chopped off I have wedged in and screwed in to the gravelboard on the fence. I didn’t get the measurements quite right on the left hand side but it was pretty tricky with the pipes and I certainly wasn’t removing any pipework as I am well aware of where my competence ends. Presumably a lot easier if not retrofitting.

I don’t think I’m winning any marks for presentation here but I think it will do the job.
218F7428-5817-42DE-9C59-D4FD5EA9651E.jpeg
 
Helped a mate build a log shelter out of pallets a few years ago. Didn't look too swish - cheap & cheerful - it kept the rain off the logs, they used chicken wire to stop smaller bits jamming or falling into what should be the air gaps.
 
Thanks both. I ended up going for a combination of hole saw and hacksaw not having tin snips. Had to cut off a bit completely on the right to get it in over the pipes. I can’t say it’s the neatest but just about managed to drill a hole for one of the wings m under the pipe (a very close fit) and them an even closer fit lying on my tummy to screw it in.

The bit I chopped off I have wedged in and screwed in to the gravelboard on the fence. I didn’t get the measurements quite right on the left hand side but it was pretty tricky with the pipes and I certainly wasn’t removing any pipework as I am well aware of where my competence ends. Presumably a lot easier if not retrofitting.

I don’t think I’m winning any marks for presentation here but I think it will do the job.
View attachment 369716
Let's not beat about the bush here: this is an absolute shambles of a job.
 
Back
Top Bottom